Field note 007 · Cut / maintain
Hone or sharpen? Run the kitchen knife edge test
A honing rod cannot rescue every dull edge, and a sharpener should not be the reflex for every poor cut. Diagnose the blade, the cutting surface, and the tool match before removing steel.
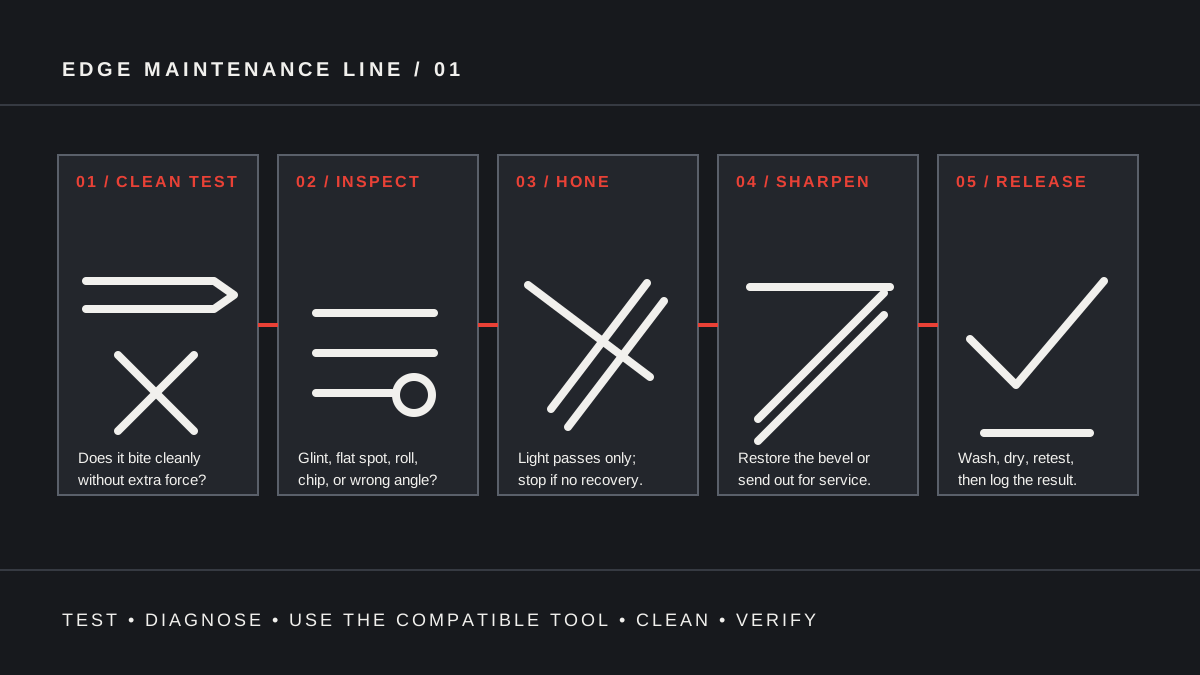
“Dull” describes a result, not a diagnosis. A knife may skid because the apex has worn flat, folded slightly, chipped, collected residue, met a hard cutting board, or been presented at the wrong angle. Those conditions do not call for the same response.
That distinction matters because edge tools do different work. A smooth or finely grooved steel is commonly used for light maintenance. A ceramic or diamond rod is abrasive and can remove metal even though it has the same long-rod shape. Stones and powered or manual sharpeners are intended to form an edge. Public knife discussions repeatedly blur those categories, especially when every rod is called a “steel” and every pass is called “sharpening.” Treat the product label and the knife maker’s instructions as controlling evidence.
OSHA advises keeping knives sharp and in good condition because dull knives can slip, while also recommending that sharpening be done by trained, experienced workers. At home, work slowly on a stable, uncluttered surface. Keep the edge moving away from hands, do not catch a falling knife, and stop if the blade, tool, or technique is unfamiliar.
1. Separate maintenance from edge creation
Maintain a compatible edge
Use light passes with the maker-approved rod or strop when the knife has lost a little bite but has no visible damage. The goal is a small, measurable improvement—not a ritual number of strokes.
Create a fresh apex
Use a compatible stone, guided system, pull-through device, or professional service when maintenance no longer restores cutting performance. Sharpening removes steel and must preserve the intended bevel.
Restore damaged geometry
Route chips, a broken tip, a bent blade, deep corrosion, a loose handle, or a visibly uneven bevel to a qualified service. Ordinary honing is not structural repair.
Remove the cause
Change a glass, stone, ceramic, or metal cutting surface; stop scraping with the edge; improve storage; or use a knife designed for bones, frozen food, and other hard work.
The familiar statement that honing “does not remove metal” is too broad. Victorinox distinguishes honing from sharpening but also classifies diamond, tungsten-carbide, and ceramic tools as abrasive options. Shun specifically warns that a diamond steel removes metal and is not its routine honing tool. A smooth steel may mainly reposition a rolled edge; a ceramic or diamond surface also abrades it. Record the tool material, not just the word printed on the package.
2. Build a clean baseline
- Wash and dry the knife. Food residue can imitate drag. Use the maker-approved cleaning method, keep the edge visible, and never leave a knife hidden in a sink.
- Stabilize the station. Put the cutting board on a dry counter; add a damp towel beneath it if it slides. Clear cords, dishes, and people from the working arc.
- Use the normal food task. Test with a tomato, onion skin, herb, or other food the knife routinely handles. Do not use your thumb or fingertip to feel sharpness.
- Use one controlled cut. Note where the blade skids, crushes, wedges, or needs extra force. Test heel, middle, and tip without sawing aggressively.
- Record the starting result. “Feels dull” is hard to compare. “Tomato skin skids at the middle third unless pressure increases” gives the maintenance pass a clear target.
Some manufacturers suggest a clean paper test. It can be a repeatable option when used cautiously, but it does not reproduce food geometry and loose paper invites awkward hand placement. A stable food test tied to the knife’s job is more useful for a home prep line. Whatever test you choose, use the same material and motion before and after maintenance.
3. Inspect without touching the edge
Under bright, raking light, hold the stationary knife by the handle with the edge pointed away from you. Rotate the blade slightly. A fresh, very narrow apex reflects little light; a flattened section may flash as a bright line or dot. This is a screen, not a measurement: finish marks, oil, and residue can also reflect.
| Observation | Likely route | Stop condition |
|---|---|---|
| Clean edge, slight loss of bite, no chip | Try a few light passes with a compatible honing tool. | No clear improvement after the first controlled set. |
| Continuous bright flat spot or rounded feel in the normal cut | Sharpen to recreate the apex. | Unknown bevel, angle, or tool compatibility. |
| Localized glint, snag, or tiny missing section | Inspect for a chip; use professional repair if uncertain. | Any crack, deep chip, or rapidly growing damage. |
| Knife wedges although the apex bites | Geometry may be thick behind the edge; seek skilled thinning or evaluation. | Do not grind the side freehand without the required skill. |
| Only one board or motion causes skidding | Correct the surface or technique before altering the edge. | Glass, stone, ceramic, metal, or unstable board. |
| Serrated, single-bevel, scalloped, coated, or specialty edge | Follow its exact manual or use the maker’s service. | Do not force it through a generic slot or use a symmetric method. |
4. Read both labels before choosing a tool
There is no universal kitchen-knife angle. Wüsthof’s current instructions specify 14 degrees per side for its knives. Shun identifies a 16-degree guide for its compatible honing steel. Victorinox demonstrates 20 degrees in one consumer honing guide. Those are maker-specific examples, not values to average. Use the specification for the exact knife and maintenance tool you own.
- Knife: maker, line, steel if disclosed, straight or serrated edge, single or double bevel, factory angle, coating, current damage, and warranty/service terms.
- Tool: smooth steel, grooved steel, ceramic, diamond, stone, fixed-angle slots, powered abrasive, strop, or professional service.
- Match: supported blade type, angle, knife length, required pressure, wet/dry use, cleaning method, and whether the maker describes the operation as maintenance, sharpening, or repair.
- Exclusions: ceramic knives, serrations, scissors, single-bevel knives, thin hard blades, and coated blades often have different or restricted routes.
If the knife documentation is missing, do not assume the angle from country of origin or appearance. Ask the maker, use a reputable professional who will document the intended geometry, or choose the least invasive safe option until compatibility is known.
5. Run one controlled honing set
Follow the knife and rod instructions when they differ from this general station setup. For a conventional compatible rod, the stable vertical method keeps the work low and makes the angle easier to see.
- Place a folded towel on the counter and set the rod tip on it. Hold the handle behind its guard with the rod vertical.
- Set the knife heel against the rod at the maker-specified angle. Keep the edge facing away from the rod hand.
- With light pressure, move from heel to tip while drawing the blade down the rod. The whole edge should travel; speed adds no value.
- Alternate sides, using the same angle and number of passes. Start with only a few passes per side.
- Wash and dry the knife and clean the rod as its maker directs. Metal particles and food do not belong on the prep line.
- Repeat the same baseline cutting test. If there is a clear improvement, log it and stop. If there is no meaningful improvement, do not keep adding strokes—route to sharpening or service.
Do not swing the knife and rod in the air to imitate a television kitchen. Do not drag the edge toward your rod hand. Do not press hard enough to flex the rod or blade. The objective is consistent contact at the correct angle, not sparks, noise, or speed.
6. Route sharpening by risk and repeatability
Sharpening is due when a clean, undamaged knife fails its normal task and compatible honing no longer improves it. It is also the route for a worn flat apex. The right system is the one that can reproduce the specified bevel without introducing a new problem.
Control with a skill cost
Offers angle and abrasive choice, but requires consistent technique, burr control, stone maintenance, and a safe work surface.
Repeatable angle
Can simplify consistency if its clamps, angle range, and abrasives fit the blade. Check length, width, and finish restrictions.
Fast but specific
Use only when the device supports the knife’s edge type and angle. A preset slot is not automatically compatible with every blade.
Best for uncertainty
Prefer a service that records the requested angle, abrasive process, chip limits, turnaround, insurance, and material removal.
Stop home sharpening if you cannot hold the angle, cannot identify the bevel, produce an uneven scratch pattern, find a chip or crack, or see the stone dishing. A concave stone surface can change the bevel. A powered grinder can overheat steel when used without the required equipment and skill; Victorinox specifically warns that grinding requires ample cooling to prevent heat damage.
Sharpening frequency should follow performance, not a rigid monthly reminder. Usage, board material, cutting motion, steel, edge angle, storage, and food all change the interval. Repeatedly sharpening a knife that only needed cleaning or a board change removes steel without solving the workflow failure.
7. Clean, verify, and return the knife to service
- Remove residue. Wash the blade with the maker-approved method after any rod, stone, or abrasive device. Rinse and dry it completely.
- Inspect the result. Under light, check for a continuous edge, new scratches outside the bevel, chips, or a remaining flat section. Never run a finger along the edge.
- Repeat the baseline test. Use the same food, section of blade, board, and motion. A safer-feeling, lower-force cut is the goal.
- Store the edge protected. Use a fitted guard, appropriate block, secure rack, or other system that prevents blade-to-blade contact and exposed edges.
- Log the work. Record date, tool, angle, passes or service, test result, damage, and next action. Tell other household members when a knife has been freshly sharpened.
OSHA advises cleaning a knife immediately after use and never leaving it in a sink. CDC’s food-safety guidance adds that utensils and cutting boards should be washed with hot, soapy water after preparing each food item. Edge work is not complete until the blade and station are clean.
8. Write the buying brief before adding another sharpener
A useful product-selection brief starts with the knives already in the drawer. List their edge types and specified angles, then identify the job the current maintenance line cannot perform. A rod may maintain one group while a stone or service handles another. One “universal” device is rarely the strongest answer.
| Claim | Evidence to find | Why it matters |
|---|---|---|
| Compatible knives | Named blade types, angle range, hardness or steel limits, and explicit exclusions. | Prevents forcing specialty edges into the wrong system. |
| Abrasive action | Rod or stone material, grit if applicable, and whether it removes steel. | Separates light maintenance from edge creation. |
| Angle control | Fixed value, adjustable range, guide accuracy, and clamping method. | Protects the intended bevel and repeatability. |
| Safe station | Guard, nonslip base, hand clearance, stable working orientation, and instructions. | Reduces avoidable movement near an exposed edge. |
| Care and service | Cleaning limits, wear indicators, replacement parts, warranty, and support. | Keeps the maintenance tool itself reliable and hygienic. |
Prices, stock, and branded listings remain unavailable here until supplier authorization and accurate commercial terms are documented. Use the site’s workspace planner to map the Cut job, compare the listing standard, then connect this edge line to the two-board prep station. A stable board and a compatible edge-maintenance process solve different parts of the same cut.