Field note 008 · Measure / cook
Put the thermometer where the heat arrives last.
A target temperature means little if the sensor is touching bone, sitting in a fat pocket, missing the center, or reading only the warmest spot. Build a repeatable measurement line: place, scan, verify, clean, and log.
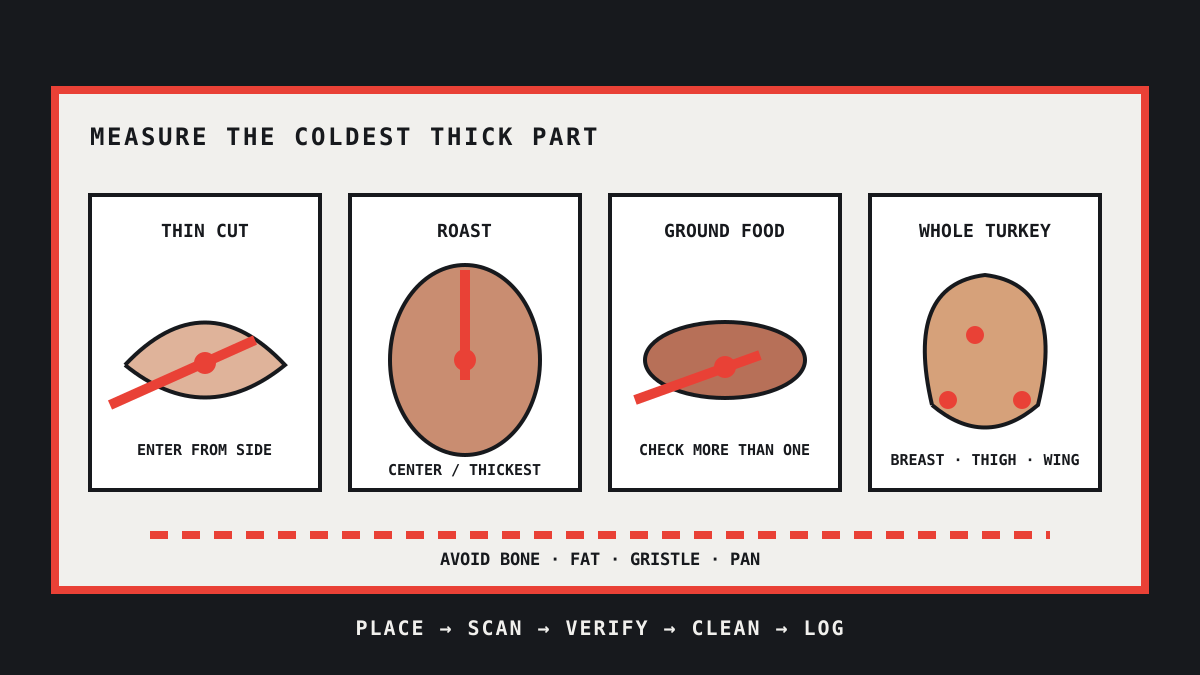
“Insert into the thickest part” is good advice, but it leaves three practical questions unanswered: where does this thermometer actually sense, how do you reach the center of a thin food, and how many places need checking? Public cooking discussions repeatedly show the same failures—an instant-read model is left in the oven, a probe touches bone, the first hot spot is treated as proof, or breast and thigh readings are assumed to be interchangeable.
The fix is a measurement workflow, not a gadget. USDA says the food thermometer must be placed correctly to show that food reached a safe temperature throughout. The FDA Food Code similarly identifies the geometric center or thickest part as the measurement point for thick foods. The aim is to find the coldest relevant point, not the highest number.
Use the current FoodSafety.gov safe-minimum-temperature chart and the instructions for the exact food. Color, clear juices, firmness, cooking time, and a pop-up indicator do not replace a food thermometer. Do not use a medical, infrared surface, candy, or appliance thermometer as a substitute unless its manufacturer explicitly rates it for the food and task.
1. Find the sensing area before the food is hot
Thermometers do not all read at the visible tip. A thermocouple commonly senses at the tiny junction near the tip and responds quickly, which suits thin foods and scanning. A bimetal dial stem often senses along a longer section—commonly from the tip to a dimple—and must be inserted deeper. Liquid-filled oven thermometers may need about two inches of immersion and are not appropriate for thin foods. The model manual controls.
Thin probe
Useful for thin patties, chops, fillets, and quick checks because the sensing zone is small and response is fast.
Longer zone
Needs enough food depth to cover the complete sensing area. A shallow poke can average food and air.
Oven-rated system
Only the probe and cable specifically rated for cooking stay in place. Route the cable as its manual directs.
Infrared tool
Reads surface temperature, not the internal center. It cannot verify internal cooking temperature.
Before cooking, mark the sensing zone on a paper sketch of the probe. If the manual is gone, search the exact model number or contact the maker. Do not guess from the display shape. Also confirm the allowed temperature range, water resistance, cleaning restrictions, and whether the unit is designed to remain in an oven.
2. Set a clean measurement station
- Read the food instructions. Identify its safe minimum temperature and any required rest time before the cook begins.
- Inspect the thermometer. Check the probe, cable, display, battery, cleanliness, and any visible damage.
- Choose the insertion path. Aim for the geometric center or thickest portion without crossing bone, fat, gristle, a cavity, pan, rack, or skewer.
- Plan for more than one reading. Irregular, stuffed, layered, ground, or multi-piece foods need multiple checks.
- Stage cleaning supplies. Prevent a raw-food probe from contaminating cooked food, hands, handles, or the storage case.
Keep raw and ready-to-eat work separated. The site's two-board prep station establishes that physical separation; the thermometer line adds a clean instrument handoff. Do not put a probe back into its case while contaminated.
3. Place the probe by food shape
| Food shape | Insertion route | Common false reading |
|---|---|---|
| Thin patty, chop, fillet, or chicken breast | Insert a suitable thin probe from the side so the sensor reaches the center of the thickest area. | Entering from the top leaves the sensor partly outside the food or too near the hot surface. |
| Roast, loaf, or thick portion | Reach the geometric center of the thickest section; check another area before release. | Touching bone, the pan, a fat pocket, or a warmer outer layer. |
| Ground meat patties or sausages | Check the center of more than one piece, especially when thickness varies. | Testing only the smallest or thinnest piece. |
| Casserole, stuffing, egg dish, or leftovers | Check the center and several locations, including dense or cool pockets. | Measuring only the bubbling edge or hot top layer. |
| Fish fillet | Enter sideways into the thickest portion when the fillet is too thin for top entry. | Reading the pan, grill grate, or thin tail end. |
| Several pieces in one batch | Test representative thick pieces in different pan zones. | Assuming equal size means equal heating. |
For a thin food, the side-entry method is the practical difference between measuring the center and measuring the cooking surface. Insert the probe far enough that the sensing zone sits fully inside the food, then move slowly through the center while watching the display. The lowest stable number along that path is the useful result.
For a roast, do not aim visually from above and stop at the first plausible number. Estimate half the thickness, note nearby bone or fat, insert toward the center, and scan slightly deeper and shallower. If the number changes sharply, the sensor may have crossed a different tissue or missed the center. Reposition and verify from another angle.
4. A whole turkey has three required checkpoints
USDA guidance for whole poultry calls for checking the thickest part of the breast, the innermost part of the thigh, and the innermost part of the wing. Avoid bone at every point. All three locations must reach 165°F (74°C). If the bird is stuffed, the center of the stuffing must also reach 165°F. A pop-up indicator does not eliminate these checks.
- Locate the thickest breast meat and insert toward its center without touching the breastbone or entering the cavity.
- Find the innermost thigh where it meets the body. Insert into muscle, not the joint or bone.
- Check the innermost wing area, again avoiding bone.
- If stuffed, place the probe in the center of the stuffing as a separate measurement.
- When any location is below 165°F, continue cooking and recheck every required point with a clean probe.
Do not use an online anecdote about lower-temperature poultry as a substitute for the consumer safe-minimum guidance. Time-and-temperature lethality processes used in specialized recipes or regulated operations require validated controls. This guide uses the straightforward federal consumer endpoint.
5. Scan for the cold point, then verify
A single number is a sample, not a map. Near the expected finish time, remove the food from active heat when practical and safe, insert the cleaned probe, wait for the model's specified stabilization, and watch the trend. With a fast tip-sensitive probe, pass slowly through the suspected center. If the display falls and then rises, the low point is the center of the thermal gradient. Repeat from a second route.
For batches, test more than one item. Pan edges, hot spots, thickness, crowding, starting temperature, and contact with the cooking surface create variation. Choose the thickest pieces and different positions. If one fails, the batch is not released; continue cooking as appropriate and recheck with a clean probe.
Release log
Keep the log short enough to use. For a holiday meal, write the target and checkpoints on the prep schedule before the oven is full. Pair it with the Thanksgiving refrigerator line and the safe-thawing workflow so cold storage, thawing, cooking, and leftovers connect.
6. Match the food to the current federal target
The following is a working summary of the FoodSafety.gov chart, reviewed November 15, 2026. Check the live chart for updates and food-specific notes before cooking.
| Food | Minimum | Rest or note |
|---|---|---|
| Whole or ground chicken, turkey, and other poultry; stuffing; casseroles; leftovers | 165°F / 74°C | Check all required locations; stuffing is measured at its center. |
| Ground beef, pork, veal, lamb, goat, or bison; sausage | 160°F / 71°C | Ground poultry remains 165°F. |
| Beef, pork, veal, lamb, goat, or bison steaks, chops, and roasts | 145°F / 63°C | Rest at least 3 minutes. |
| Fish | 145°F / 63°C | Chart also gives appearance alternatives for seafood; temperature is the clearer measurement route. |
| Egg dishes | 160°F / 71°C | Raw eggs: cook until yolk and white are firm. |
| Precooked ham reheated at home | 165°F / 74°C | USDA-inspected packaged cooked ham has a separate 140°F reheating note. |
Rest time is part of the safety instruction for intact steaks, chops, and roasts at 145°F. Start the rest clock only after the measured endpoint is reached. For packaged foods, follow validated package cooking directions as well as applicable federal guidance; do not override a more specific instruction with this summary.
7. Clean the probe and verify its behavior
Clean the probe with hot, soapy water before and after each use, following the manufacturer’s water-resistance limits. Do not immerse a display or connector unless it is rated for immersion. When moving from raw food to a near-finished check, wash the probe and hands and avoid touching contaminated handles, towels, or cases.
Check accuracy at the interval and by the method the maker specifies. Ice-point and boiling-point checks are common, but elevation and atmospheric pressure affect the boiling point, and a poorly made ice slurry can produce a misleading test. Calibration is not available on every model; some units require adjustment, service, or replacement. Record the date, method, observed result, adjustment, and person.
A thermometer can be accurate at one point yet slow, damaged, hard to insert, or unsuited to thin foods. Retire it from the critical task if the stem is bent, cable insulation is damaged, display is intermittent, battery compartment is compromised, or readings are unstable after the troubleshooting steps in its manual.
8. Write the buying brief around the food
Start with the foods and geometry you measure, not a feature list. Thin cutlets need a small sensing zone and quick response. A roast benefits from an oven-rated leave-in probe plus an instant-read verification tool. Large whole poultry needs enough probe length and a display readable from a safe position. Accessibility may require a large rotating display, strong contrast, tactile controls, audible alerts, or one-handed use.
| Claim | Documentation to find | Workflow consequence |
|---|---|---|
| Sensing area | Exact location and required insertion depth | Determines whether thin foods can be measured correctly. |
| Response | Stated response time under defined conditions | Changes how quickly a cold point can be scanned. |
| Oven use | Temperature limits for probe, cable, connector, and display | Separates leave-in systems from instant-read tools. |
| Accuracy | Specified tolerance and range, calibration or verification method | Shows whether the result is fit for the critical endpoint. |
| Cleaning | Water-resistance rating and approved cleaning method | Prevents damage and cross-contamination. |
| Service | Battery, replacement probes, warranty, and support | Determines whether the tool remains maintainable. |
Prices, checkout, branded listings, and availability remain disabled here until supplier authorization and accurate commercial terms are documented. Use the site's workspace planner to map the Measure job and the listing standard to evaluate documentation before purchase.